As a crafter, every now and then we have a product that just doesn’t sell. Our choices are to bring it back the next year, mark it down, give it away or give it a face lift. With this sign, I tried bringing it back another season, I tried marking it down and then I decided to give it a facelift. Let me show you how I did it!
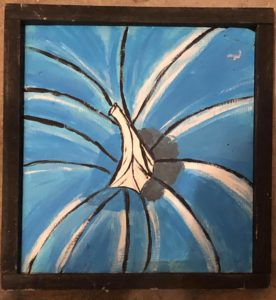
I painted this teal pumpkin – a view looking down from above. I loved it with the black stain-look frame. Apparently I was the only one!! Giving it a new dark look was the easiest way to cover it all up! Plus I wanted a piece that would match my family wall. Here are step-by-step instructions in case you want to give it a try!
Step 1
The first step is to sand the wood sign. I used my Ryobi circular sander to sand off as much as I could. The main purpose was to smooth the sign. I did not need to worry about covering up the colors as I was using black paint, but if you plan on painting a lighter color you will want to sand off as much color as possible.
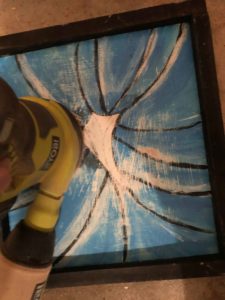
Next I grabbed a piece of sand paper and sanded in the four corners as my sander could not get into the corners.

Step 2
Wipe off the sign with a damp cloth to get all the dust and sawdust. Let dry. I used a damp paper towel for this.

Step 3
Painting is next! I use Americana black acrylic paint and a chippy style brush and paint two coats. I paint the front and the frame. I let it dry completely between coats.


Step 4
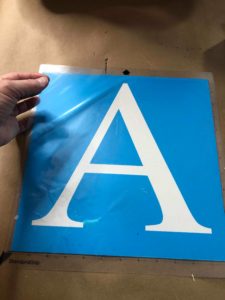
While the paint was drying, I went to my Silhouette Cameo and created a stencil. I wanted to paint a large letter A, so I found a font I liked and sized the A to fit my sign. I cut it out using Oramask 813 stencil adhesive material.


Step 5
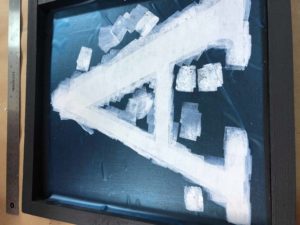
Next I prep the stencil. Using my Cricut Weeding tool, I peel away the A and put transfer tape on top of the stencil. Rub a scraper (or credit card) over the transfer tape to burnish the stencil to the transfer tape.


Step 6
Carefully remove the transfer tape and stencil from the paper backing and place it on the wood sign.
***If you already have hardware on the back of the sign, make sure you put the design on the right way!!
Oramask is easy to work with, you can peel it back up if you start to put it on crooked or off center. Then use a scraper to burnish the stencil onto the wood sign. Then carefully peel off the transfer tape.

Step 7
Now it is time to paint the letter! Again, I use Americana acrylic Paint – this time in white. You can use what ever brand of paint you want, but I do prefer acrylic paint for this type of project. I pour a little paint on a coated paper plate and use a wedge cosmetic sponge to dab the paint on the stencil.
LESS is MORE!! Be careful not to get too much paint on your sponge – it can seep under your stencil. It is better to do two or three light coats of paint.


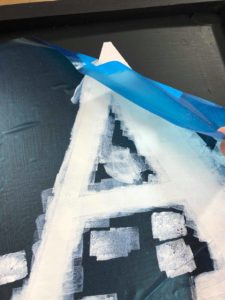
Step 8
While the paint is still a little wet, slowly peel the stencil off the sign. If you have any touching up to do, wait until the sign is completely dry and grab a tiny brush to touch it up.
Step 8
Enjoy your brand new sign. Hang it up or take it to your next craft show to sell. Mine is going on our Family Wall along with some photos and a quote.

Supplies and Tools
Listed below are the tools and supplies I use.
If you have a Silhouette Cameo and would like to learn how to use it to make projects like this, I have online classes in my membership and you can get more information HERE.
I get my transfer tape at Dollar Tree – it is their version of Clear Contact Paper.
Lori Apgar Creates is a participant in the Amazon Services LLC Associates Program, an affiliate advertising program designed to provide a means for sites to earn advertising fees by advertising and linking to amazon.com