Selling your crafts at a craft show is a great way to get your name out there and make some money!!! You will draw more people into your booth if your product is easily seen and easily shopped. Finding and making display pieces will help show off your beautiful crafts!!! Most shows offer a space around 10’x10′, some smaller, some bigger. Some shows allow you to purchase additional spots. Before every show, I draw a diagram using a 1″ scale – so every inch on paper is a foot in the booth. That way I arrive with a plan which saves me time!! Sometimes the plan does change a bit depending on what kind of set up is next to me or behind me, but that is usually an easy switch!
Here is a picture of my craft show from March 10, 2018 – my best one day show to date!! I have been doing this craft show in the spring and fall for 4 years and it is an established show that only accepts hand made crafts. My space here is 10″ deep by 15″ wide because my neighbor and I split 3 (10×10) spaces. The relationships you make with your neighbors can increase your sales, but that is another blog post!!!
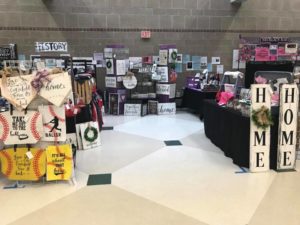
As you can see, I sell a variety of crafts which helps draw people into my booth. The type of crafts you will be selling will determine the displays you need. I have several examples of the displays that I use here for inspiration. I also take advantage of the wall behind me for my tall displays and some larger signs to help draw people in. I can fit so much more items in my booth with a U shape design. I have been at shows where all I have is a table and I am not able to take as many pieces and display pieces. I use wood crates stacked on the table to create height.
The first thing I set up is my two 6 ft. tables. They are on each side of the booth. I cover them with black tables cloths that hang down to the floor – these were pretty inexpensive and I found them online – after each show I toss them in the washing machine. During the show, I hide some extra product and supplies under the tables.
You can find tables HERE
You can find table cloths HERE
I look for light weight displays that are functional for my products and fit in my vehicle. I have made and also modified some display pieces myself. Creating displays for a craft show can be fun and challenging at the same time but the unusual pieces also draw attention to my booth.
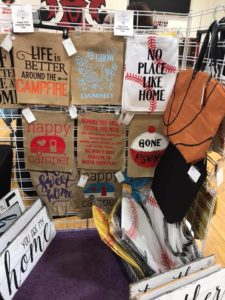
A crib side rail is handy for hanging tea towels, garden flags and small wood signs. This piece was built out of 1×2 boards to mimic the crib rail. It is light weight and very versatile! I either put a zip tie around the bars to hook S-hooks on, or use nice pants hangers with the clips and swivel head to hold my products. I did not use this at my craft shows this spring, but will be taking it to a shop I sell in to hang my spring garden flags on.
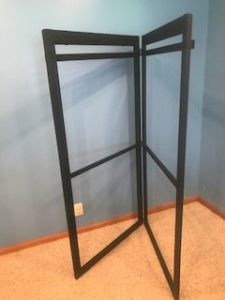
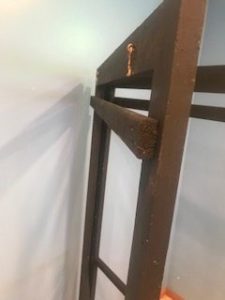
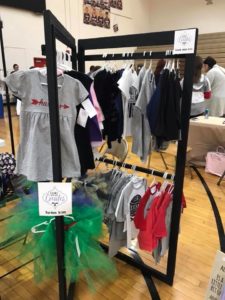
This display was built using two large window screens that I found at a shop in the back room. I removed the screen and added a 1×2 piece of wood near the top of both sides. I used three hinges to fasten the two screen frames together. This display is light weight and folds in half for easy transporting.
I hung shirts, onesies and tutus on this display at my last two shows.
If you don’t have old window screens, this display can be built using 1×2 boards.
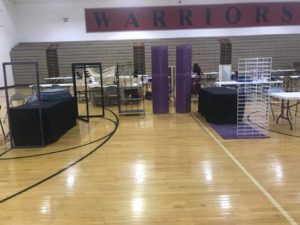
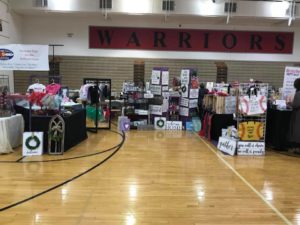
The rest of the displays that I use frequently are in these pictures from my current craft show set up! The picture on the top is the “bones” of my craft show. As I mentioned above, I always mock up a drawing of my space a few days before the craft show. If I can set up the evening before the show, I set up my display pieces.The bottom picture is my booth all ready for customers!!! It always takes me longer if I don’t have a plan!!!! Sometimes I tape off my floor in the basement at home and set up my displays to determine the best way to arrange my booth!

This black iron shelf collapses and while a little heavy, it fits in the back of my Honda Pilot. I use it to display my small signs and home decor pieces. I bought this piece from a store that was going out of business and I believe it came from Hobby Lobby years ago. I love the flexibility of this piece!
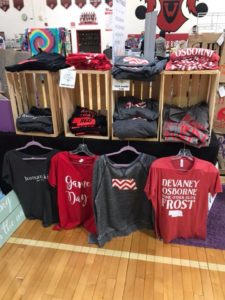
I used wood crates to display my adult size t-shirts. I folded two designs in each crate (one inside the crate and the other on top) and used a hanger to hold one shirt from each crate. This was a great way to display the shirts, but there was some dead space behind the crates that I could not use. I will use a smaller skinny table next time – I have a 2′ x 4′ table that will be perfect!
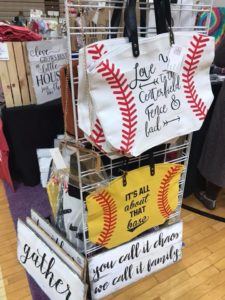
I used three pieces of 2’x4′ grid to create this space. I used zip ties to attach them into an L shape. The baseball/softball bags hung on the outside of the booth facing the customers. On the back side of that grid was the rest of the bags. The garden flags were hanging on the other two grids. I displayed some extra signs inside as well and was able to fill in holes when signs sold. This show required me to put something down on the floor to protect it from the metal grids, so I grabbed my purple rug from my craft room.
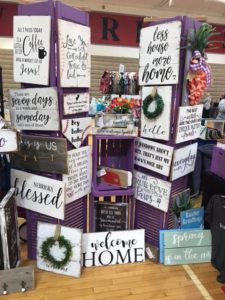
These bi-fold shutter closet doors are very light and easily transported in my car too. My son built a brace for the top of each door and I use S-hooks to hold my wood signs. I stacked two crates between them. I painted them all purple (my signature color) and filled them up! Tip – always bring extra S-hooks as they sometimes fling off when you remove a sign never to be seen again!!
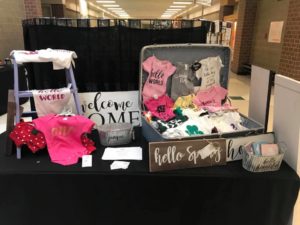
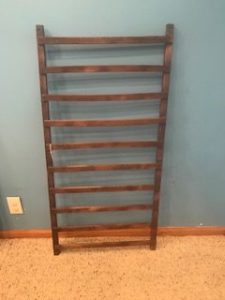
I love using old suitcases to display onesies! I attached twine inside the lid and clothes pin onesies on them. I fold the rest inside the suitcase. In the side pockets of the suitcase, I stash extra S-hooks, clothes pins, safety pins and business cards! The small ladder is a new addition and can provide height as well as some fun to my display. Bonus – it was purple when I bought it!!
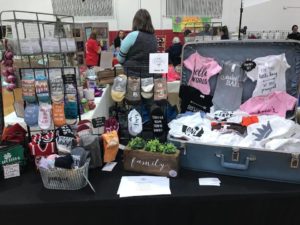
Here is another suitcase display along with mini grid walls. The grid walls hold some socks with words on the bottom – poking them through the grid openings allow the words to be read. I also use baskets to sort and display some socks. Notice the paper and business cards on my table? I type up a half sheet listing where all you can find me and my work. I sell in some shops and online. I also include upcoming craft shows that I will be at.
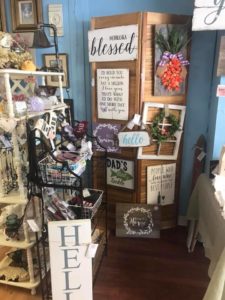
Here is another bi-fold door that is a little wider. I currently use this one at a shop I sell in. I do not have a brace for this one (yet) so I only use it against a wall. I use it with S-hooks to display wood signs. I also have a smaller black metal shelf that collapses flat to display my socks.
Here is where you can find the grid walls that I use:

![]()
I hope I was able to inspire you to create some unique and functional displays for your next show. Because I don’t sell everything, some of my displays may not work for you. I have several pins posted on my Pinterest Page if you are needing additional ideas – you can find them HERE!
Thank you and Happy Crafting!!
***some of the links included are affiliate links. I earn a small percentage of the sale if you purchase using my links
Great ideas! Thanks for sharing!
Hello!
Just found your site as I was surfing and I have to say yours is not only one of the best, your explanation is truly a blessing for newbies like myself. I do wish your pictures had the ability to enlarge as I would love to see some of your display closer but thank you for sharing!
Blessings,
Thank you so much!!! I do have a Pinterest Board with craft show booth ideas that may help https://www.pinterest.com/loriapgar/craft-show-display/